iFBalance-코딩으로 뽀샤버리기

3강. Free RTOS 기초

Posted by INDIFROG on 2021-03-03
Words 1.9k and Reading Time 12 Minutes
Viewed Times

3강. Free RTOS 기초

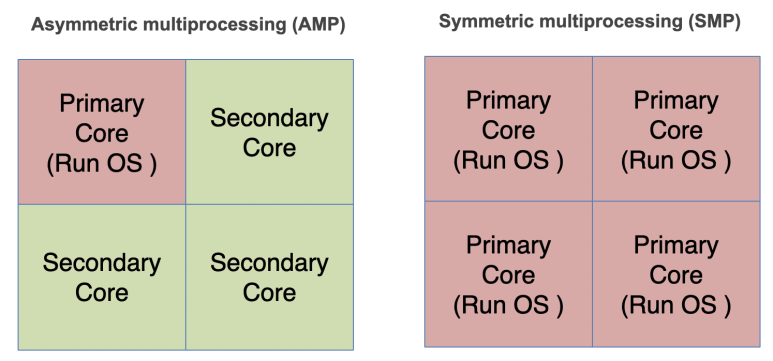
FreeRTOS는 기본적으로 멀티 코어 프로세서를 지원하지 않지만 ESP-IDF와 같은 일부 변형은 이를 지원합니다. 먼저 AMP (비대칭 다중 처리)와 SMP (대칭 다중 처리)의 차이점을 살펴 보겠습니다.

VSCODE_LIB

AMP(Asymmetric multiprocessing)는 여러 코어 또는 프로세서를 사용하여 동시에 여러 작업을 실행하는 프로그래밍 패러다임입니다. 하나의 코어 / 프로세서가 운영 체제 (OS)를 실행하는 기본 코어가 되어야 합니다. 보조 코어라고 하는 다른 코어로 작업을 보냅니다. 이러한 코어는 동일한 아키텍처 일 수도 있고 아닐 수도 있습니다. 실제로 별도의 컴퓨터에 AMP 구성을 설정할 수 있습니다.

​SMP(symmetric multiprocessing) 다중 스레드 프로그램을 다중 코어에서 실행할 수있는 패러다임이기도합니다. 그러나 SMP에서 각 코어는 OS 사본을 실행합니다. 각 코어의 스케줄러는 독립적으로 작동하며 공유 목록에서 작업을 실행하도록 선택합니다. SMP를 사용하려면 코어가 단단히 결합되어야하며 종종 RAM 및 기타 리소스를 공유해야합니다. 결과적으로 일반적으로 SMP는 동일한 아키텍처의 여러 코어 위에 구축됩니다.

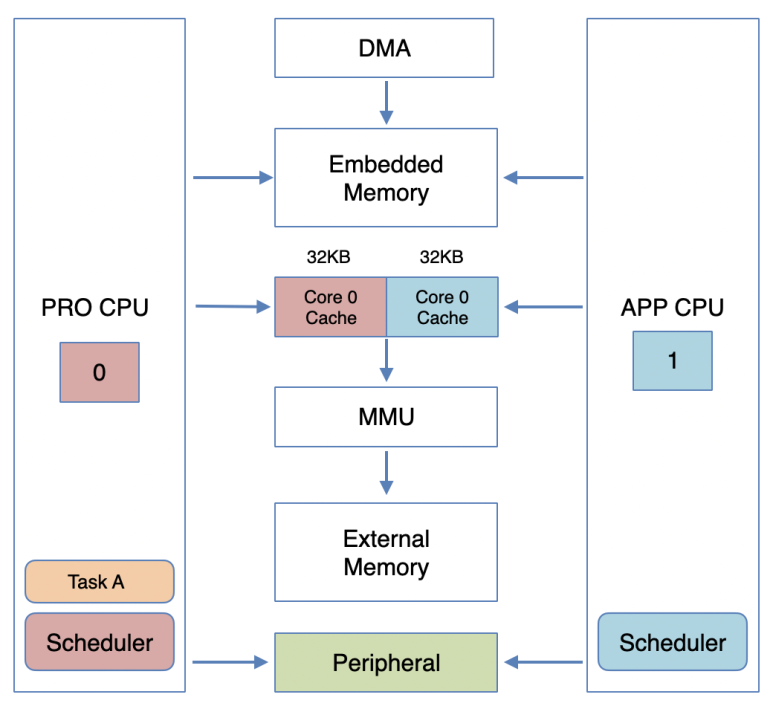
​원래 바닐라 FreeRTOS는 단일 코어에서 실행되도록 설계되었습니다. ESP-IDF FreeRTOS는 대칭 다중 처리 (SMP)를 지원하는 바닐라 FreeRTOS의 수정된 버전입니다. ESP-IDF FreeRTOS는 FreeRTOS v10.2.0의 Xtensa 포트를 기반으로합니다.

​ESP32는 Core가 2개이며 프로토콜 CPU (CPU 0 또는 PRO_CPU로 알려짐)와 애플리케이션 CPU (CPU 1 또는 APP_CPU로 알려짐)를 포함하는 듀얼 코어입니다. 두 개의 코어는 실제로 동일하며 동일한 메모리를 공유합니다. 이를 통해 두 코어가 작업을 상호 교환적으로 실행할 수 있습니다.

VSCODE_LIB

1
2
3
4
5
6
7
8
9
10
11
12
13
14
15
16
17
18
19
20
21
22
23
24
25
26
27
28
29
30
31
32
33
34
35
36
37
38
39
40
41
42
43
44
45
46
47
48
49
50
51
52
53
54
55
56
57
58
59
60
61
62
63
64

/******************************************************************************
main.cpp - iFLine, iFBalance Arduino Library
hkkim@koreaits.com ( KITS Lab )
original creation date: April 3, 2020

Development environment specifics:
Arduino IDE 1.8.x
iFBalance
******************************************************************************/

#include <Arduino.h>

#define SerialDebug false // Set to true to get Serial output for debugging


#define PRO_CPU 0
#define APP_CPU 1

// BLUE LED Pins
static const int pinBlueLED = GPIO_NUM_4;

// Our task: blink an LED
void taskToggleBlueLED(void *pvParameter) {
portTickType delay = *(portTickType*)pvParameter;

while(1) {
digitalWrite(pinBlueLED, HIGH);
vTaskDelay(delay / portTICK_PERIOD_MS);

digitalWrite(pinBlueLED, LOW);
vTaskDelay(delay / portTICK_PERIOD_MS);
}
}

void setup() {
Serial.begin( 921600 );
delay(1000);
// Configure pin
pinMode(pinBlueLED, OUTPUT);

//
int32_t timeDelay = 500;
TaskHandle_t taskHandle;

// Task to run forever
xTaskCreatePinnedToCore( // Use xTaskCreate() in vanilla FreeRTOS
taskToggleBlueLED, // Function to be called
"Toggle BLUE LED", // Name of task
1024, // Stack size (bytes in ESP32, words in FreeRTOS)
(void*)&timeDelay, // Parameter to pass to function
uxTaskPriorityGet(NULL), // Task priority (0 to configMAX_PRIORITIES - 1)
&taskHandle, // Task handle
PRO_CPU); // core No.

Serial.println("taskHandle ID: " + String( uxTaskPriorityGet( taskHandle ) ) );

// Delete "setup and loop" task
// vTaskDelete(NULL);
}

void loop() {
// Do nothing
}

위 코드는 xTaskCreatePinnedToCore 함수를 호출하여 태스크를 생성할 때 다음과 같은 내용을 알 수 있습니다.

  1. iFBalance의 GPIO4번에 연결된 BLUE LED를 1초마다 깜박이도록 PRO_CPU에서 태스크를 실행합니다.
  2. xTaskCreatePinnedToCore 함수의 Task 핸들파라미터로 부터 태스크의 핸들을 얻어옵니다.
  3. uxTaskPriorityGet(NULL) 함수 호출로 시스템에 부여하는 태스크의 우선순위를 지정합니다.
  4. uxTaskPriorityGet( taskHandle ) 함수를 호출하여 태스크의 우선순위를 알 수 있습니다.
  5. taskToggleBlueLED의 시간지연 값을 파라미터로 전송하는 방법을 알 수 있습니다.
  6. ESP32 시스템 구조의 블럭도처럼 태스크에서 주변장치 GPIO를 제어합니다.
1
2
3
4
5
6
7
8
9
10
11
12
13
14
15
16
17
18
19
20
21
22
23
24
25
26
27
28
29
30
31
32
33
34
35
36
37
38
39
40
41
42
43
44
45
46
47
48
49
50
51
52
53
54
55
56
57
58
59
60
61
62
63
64
65
66
67
68
69
70
71
72
73
74
75
76
77
78
79
80
81
82
83
84
85
86
87
88
89
90
91
92

/******************************************************************************
main.cpp - iFLine, iFBalance Arduino Library
hkkim@koreaits.com ( KITS Lab )
original creation date: April 3, 2020

Development environment specifics:
Arduino IDE 1.8.x
iFBalance
******************************************************************************/

#include <Arduino.h>

#define SerialDebug false // Set to true to get Serial output for debugging

#define PRO_CPU 0
#define APP_CPU 1

// BLUE LED Pins
static const int pinBlueLED = GPIO_NUM_4;

// Our task: blink an LED
void taskToggleBlueLED(void *pvParameter) {
portTickType delay = *(portTickType*)pvParameter;

while(1) {
digitalWrite(pinBlueLED, HIGH);
vTaskDelay(delay / portTICK_PERIOD_MS);

digitalWrite(pinBlueLED, LOW);
vTaskDelay(delay / portTICK_PERIOD_MS);
}
}

// Our task: blink an LED
void taskToggleBlueLED2(void *pvParameter) {
portTickType delay = *(portTickType*)pvParameter;

while(1) {
digitalWrite(pinBlueLED, HIGH);
vTaskDelay(delay / portTICK_PERIOD_MS);

digitalWrite(pinBlueLED, LOW);
vTaskDelay(delay / portTICK_PERIOD_MS);
}
}

void setup() {
Serial.begin( 921600 );
delay(1000);
// Configure pin
pinMode(pinBlueLED, OUTPUT);

//////////////////////////////////////////
//
int32_t timeDelay = 500;
TaskHandle_t taskHandle;

int32_t timeDelay2 = 323;
TaskHandle_t taskHandle2;
//////////////////////////////////////////

// Task to run forever
xTaskCreatePinnedToCore( // Use xTaskCreate() in vanilla FreeRTOS
taskToggleBlueLED, // Function to be called
"Toggle BLUE LED", // Name of task
1024, // Stack size (bytes in ESP32, words in FreeRTOS)
(void*)&timeDelay, // Parameter to pass to function
uxTaskPriorityGet(NULL), // Task priority (0 to configMAX_PRIORITIES - 1)
&taskHandle, // Task handle
APP_CPU); // core No.

// Task to run forever
xTaskCreatePinnedToCore( // Use xTaskCreate() in vanilla FreeRTOS
taskToggleBlueLED2, // Function to be called
"Toggle BLUE LED2", // Name of task
1024, // Stack size (bytes in ESP32, words in FreeRTOS)
(void*)&timeDelay2, // Parameter to pass to function
uxTaskPriorityGet(NULL), // Task priority (0 to configMAX_PRIORITIES - 1)
&taskHandle2, // Task handle
APP_CPU); // core No.

Serial.println("taskHandle ID: " + String( uxTaskPriorityGet( taskHandle ) ) );
Serial.println("taskHandle2 ID: " + String( uxTaskPriorityGet( taskHandle2 ) ) );

// Delete "setup and loop" task
// vTaskDelete(NULL);
}

void loop() {
// Do nothing
}
  1. 이번에는 iFBalance의 GPIO4번에 연결된 BLUE LED를 2개의 태스크에서 각각 500ms, 333ms 로 깜박이도록 APP_CPU에서 태스크를 실행합니다.
  2. 어떻게 동작할까요?
  3. 반대로 PRO_CPU로 바꾸면 어떻게 동작할까요?
  4. 하기 변수들을 로컬 변수가 아니라 static 혹은 전역변수로( setpup 함수 밖 ) 이동하면 APP_CPU에서는 어떻게 동작할 까요?

    //////////////////////////////////////////
    //
    int32_t timeDelay = 500;
    TaskHandle_t taskHandle;

    int32_t timeDelay2 = 323;
    TaskHandle_t taskHandle2;
    //////////////////////////////////////////

  5. setup() 함수가 APP_CPU에서 동작을 하기 때문에 taskHandle을 로컬 변수로 선언을 하게 되면 정상 동작을 하지 않는 듯 보입니다.

4. iFLED class 구현

앞으로 iFBalance에서 사용될 정형화된 Task 기반 클래스를 만들어 봅시다. ​

iFLED.h

1
2
3
4
5
6
7
8
9
10
11
12
13
14
15
16
17
18
19
20
21
22
23
24
25
26
27
28
29
30

/******************************************************************************
iFLED.h - iFBalance Arduino Library
hkkim@koreaits.com ( KITS Lab )
original creation date: April 3, 2020

Development environment specifics:
Arduino IDE 1.8.x
iFBalance
******************************************************************************/

#pragma once

#include <Arduino.h>

class iFLED
{
private:
int32_t timeDelay = 500;
TaskHandle_t taskHandle;

static gpio_num_t pin;

public:
iFLED(){};
void init(gpio_num_t io, int core);

static void taskFunc(void *pvParameters);

};

iFLED.cpp

1
2
3
4
5
6
7
8
9
10
11
12
13
14
15
16
17
18
19
20
21
22
23
24
25
26
27
28
29
30
31
32
33
34
35
36
37
38
39
40
41
42
43
44
45

/******************************************************************************
iFLED.cpp - iFBalance Arduino Library
hkkim@koreaits.com ( KITS Lab )
original creation date: April 3, 2020

Development environment specifics:
Arduino IDE 1.8.x
iFBalance
******************************************************************************/

#include "Arduino.h"
#include "iFLED.h"

gpio_num_t iFLED::pin = GPIO_NUM_4;

void iFLED::taskFunc(void *pvParameters)
{
portTickType delay = *(portTickType*)pvParameters;

while(1) {
digitalWrite(pin, HIGH);
vTaskDelay(delay / portTICK_PERIOD_MS);

digitalWrite(pin, LOW);
vTaskDelay(delay / portTICK_PERIOD_MS);
}
}

void iFLED::init(gpio_num_t io, int core)
{
pin = io;

// Configure pin
pinMode(pin, OUTPUT);

xTaskCreatePinnedToCore( taskFunc, "taskFunc",
2048,
(void*)&timeDelay,
uxTaskPriorityGet(NULL),
&taskHandle,
core);

Serial.println("taskHandle ID: " + String( uxTaskPriorityGet( taskHandle ) ) );
}

main.cpp

1
2
3
4
5
6
7
8
9
10
11
12
13
14
15
16
17
18
19
20
21
22
23
24
25
26
27
28
29
30
31
32
33
34

/******************************************************************************
main.cpp - iFLine, iFBalance Arduino Library
hkkim@koreaits.com ( KITS Lab )
original creation date: April 3, 2020

Development environment specifics:
Arduino IDE 1.8.x
iFBalance
******************************************************************************/

#include <Arduino.h>
#include "iFLED.h"

#define SerialDebug false // Set to true to get Serial output for debugging
#define PRO_CPU 0
#define APP_CPU 1

iFLED ifLed;

void setup() {
Serial.begin( 921600 );
delay(1000);

ifLed.init( GPIO_NUM_4, PRO_CPU);

// Delete "setup and loop" task
// vTaskDelete(NULL);
}

void loop() {
// Do nothing

}

4. ESP32에서 portMUX_Type을 이용한 Critical Section 구현


Vanilla FreeRTOS는 portDISABLE_INTERRUPTS()를 호출하는 taskENTER_CRITICAL()을 사용하여
critical section을 구현합니다. 이렇게하면 critical section 동안 선점 컨텍스트 전환 및 ISR 서비스가 방지됩니다. 따라서 critical section은 vanilla FreeRTOS의 동시 액세스에 대한 유효한 보호 방법으로 사용됩니다.

반면에 ESP32는 코어가 서로의 인터럽트를 비활성화하는 하드웨어 방법이 없습니다. portDISABLE_INTERRUPTS () 호출은 다른 코어의 인터럽트에 영향을 미치지 않습니다. 따라서 인터럽트를 비활성화하는 것은 현재 코어가 자체 인터럽트를 비활성화 한 경우에도 다른 코어가 데이터에 자유롭게 액세스 할 수 있도록 하기 때문에 공유 데이터에 대한 동시 액세스에 대한 유효한 보호 방법이 아닙니다.

이러한 이유로 ESP-IDF FreeRTOS는 portMUX_Type 객체로 참조하는 특수 뮤텍스를 사용하여 critical section을 구현합니다. 이들은 특정한 spinlock 구성 요소로 구현됩니다. vTaskEnterCritical 또는 vTaskExitCritical 대한 호출은 각각 spinlock 객체를 인수로 제공합니다.

1
2
3
4
5
6
7
8
9
10

#define portENTER_CRITICAL(mux) vTaskEnterCritical(mux)
#define portEXIT_CRITICAL(mux) vTaskExitCritical(mux)

// example
portMUX_TYPE iFButton::spinlock = portMUX_INITIALIZER_UNLOCKED;

portENTER_CRITICAL(&spinlock);
count = 0;
portEXIT_CRITICAL(&spinlock);

spinlock은 액세스 보호가 필요한 공유 리소스와 연결됩니다. ESP-IDF FreeRTOS에서 critical section에 들어갈 때 호출 코어는 바닐라 FreeRTOS 구현과 유사하게 인터럽트를 비활성화한 다음 spinlock을 가지고 critical section으로 들어갑니다. 다른 코어는 자체 critical section에서 동일한 spinlock을 시도하지 않는 한 이 시점에서 영향을 받지 않습니다. 이 경우 portEXIT_CRITICAL 함수로 잠금이 해제 될 때까지 루프를 돌면서 재시도하게 됩니다.

따라서 ​ESP32에서는 위와 같이 portMUX_Type을 이용하여 critical section 을 통해 다른 코어를 비활성화하지 않고도 공유 리소스에 대한 액세스를 보호 할 수 있습니다. 다른 코어는 동일한 리소스에 동시에 액세스하려는 경우에만 영향을 받습니다.

5. iFBalance에서 Critical Section 이용한 하드웨어 버튼 인터럽트 처리

다음은 GPIO_NUM_0 에 할당된 버튼이 눌렸는지 감지하는 iFButton 클래스 코드입니다.

iFButton.h

1
2
3
4
5
6
7
8
9
10
11
12
13
14
15
16
17
18
19
20
21
22
23
24
25
26
27
28
29
30
31
32
33
34
35
36
37
38

/******************************************************************************
iFButton.h - iFBalance Arduino Library
hkkim@koreaits.com ( KITS Lab )
original creation date: April 3, 2020

Development environment specifics:
Arduino IDE 1.8.x
iFBalance
******************************************************************************/

#pragma once

#include <Arduino.h>

class iFButton
{
private:
TaskHandle_t taskHandle;

static volatile bool bPressed;
static gpio_num_t pin;

private:
static void IRAM_ATTR onHandler();

public:
static portMUX_TYPE spinlock;

public:
iFButton(){};
void init(gpio_num_t pin, int core);
static void taskFunc(void *pvParameters);

public:
static bool isPressed();
static void setRelease(bool state);
};

iFButton.cpp

1
2
3
4
5
6
7
8
9
10
11
12
13
14
15
16
17
18
19
20
21
22
23
24
25
26
27
28
29
30
31
32
33
34
35
36
37
38
39
40
41
42
43
44
45
46
47
48
49
50
51
52
53
54
55
56
57
58
59
60
61
62
63
64
65
66
67
68
69
70

/******************************************************************************
iFButton.cpp - iFBalance Arduino Library
hkkim@koreaits.com ( KITS Lab )
original creation date: April 3, 2020

Development environment specifics:
Arduino IDE 1.8.x
iFBalance
******************************************************************************/

#include "Arduino.h"
#include "iFButton.h"

gpio_num_t iFButton::pin = GPIO_NUM_0;

portMUX_TYPE iFButton::spinlock = portMUX_INITIALIZER_UNLOCKED;
volatile bool iFButton::bPressed = false;

void IRAM_ATTR iFButton::onHandler()
{
portENTER_CRITICAL(&spinlock);
setRelease( true );
portEXIT_CRITICAL(&spinlock);
}

void iFButton::taskFunc(void *pvParameters)
{
for (;;)
{
if( isPressed() ){
setRelease( false );

Serial.println("iFButton pressed !!! " );
}
delay(1);
}
}

bool iFButton::isPressed(){
bool isPressed = false;

portENTER_CRITICAL(&spinlock);
isPressed = bPressed;
portEXIT_CRITICAL(&spinlock);

return isPressed;
}

void iFButton::setRelease(bool state){
bPressed = state;
}

void iFButton::init(gpio_num_t io, int core)
{
pin = io;

pinMode(pin, INPUT_PULLUP);
attachInterrupt(digitalPinToInterrupt( pin ), onHandler, FALLING);

xTaskCreatePinnedToCore( taskFunc, "taskFunc",
2048,
NULL,
uxTaskPriorityGet(NULL),
NULL,
core);

int16_t level = digitalRead( pin );
Serial.println("iFButton level : " + String( level ) );
}

main.cpp

1
2
3
4
5
6
7
8
9
10
11
12
13
14
15
16
17
18
19
20
21
22
23
24
25
26
27
28
29
30
31
32
33
34
35
36
37
38
39

/******************************************************************************
main.cpp - iFLine, iFBalance Arduino Library
hkkim@koreaits.com ( KITS Lab )
original creation date: April 3, 2020

Development environment specifics:
Arduino IDE 1.8.x
iFBalance
******************************************************************************/

#include <Arduino.h>
#include "iFLED.h"
#include "iFButton.h"

#define SerialDebug false // Set to true to get Serial output for debugging

#define PRO_CPU 0
#define APP_CPU 1

iFLED ifLed;
iFButton ifButton;

void setup() {
Serial.begin( 921600 );
delay(1000);

ifLed.init( GPIO_NUM_4, PRO_CPU);

ifButton.init( GPIO_NUM_0, PRO_CPU);

// Delete "setup and loop" task
// vTaskDelete(NULL);
}

void loop() {
// Do nothing

}

6. iFBalance에서 하드웨어 버튼이 눌렸을 때 LED 깜박이기

다음은 GPIO_NUM_0 버튼이 눌렸을 때 LED를 깜박이게 하는 기능을 토클 방식으로 제어를 하는 코드입니다.

먼저, iFLED init에서 vTaskSuspend 함수를 호출해서 iFLED 태스크가 생성되자 마자 태스크 동작을 정지 시킵니다. 그리고 나서 main loop 에서 버튼이 눌려진 것을 감지하고 이 때마다 iFLED의 태스크를 토글하도록 하는 코드입니디.

iFLED.cpp 일부 수정

1
2
3
4
5
6
7
8
9
10
11
12
13
14
15
16
17
18
19
20
21
22
23
24
25
26
27
28
29
30
31
32

/******************************************************************************/

void iFLED::init(gpio_num_t io, int core)
{
pin = io;

// Configure pin
pinMode(pin, OUTPUT);

xTaskCreatePinnedToCore( taskFunc, "taskFunc",
2048,
(void*)&timeDelay,
uxTaskPriorityGet(NULL),
&taskHandle,
core);

vTaskSuspend(taskHandle);

//Serial.println("taskHandle ID: " + String( uxTaskPriorityGet( taskHandle ) ) );
}

void iFLED::toggleBlink(){
blinkState = !blinkState;

if( blinkState ){
vTaskResume(taskHandle);
}
else{
vTaskSuspend(taskHandle);
}
}

iFLED.h 일부 수정

1
2
3
4
5
6
7
8
9
10
11
12
13
14
15
16
17
18
19
20
21

/******************************************************************************/

class iFLED
{
private:
int32_t timeDelay = 500;
TaskHandle_t taskHandle;

static gpio_num_t pin;
bool blinkState = false;

public:
iFLED(){};
void init(gpio_num_t io, int core);

static void taskFunc(void *pvParameters);
void toggleBlink();

bool isBlinking() { return blinkState; }
};

iFButton.h 일부 수정

1
2
3
4
5
6
7
8
9
10
11
12
13
14
15
16
17

/******************************************************************************/
void iFButton::taskFunc(void *pvParameters)
{

for (;;)
{
if( isPressed() ){
//setRelease( false );

Serial.println("iFButton pressed !!! " );

}

delay(1);
}
}

main.cpp 일부 수정

1
2
3
4
5
6
7
8
9
10
11
12
13
14

/******************************************************************************/
void loop() {
// Do nothing

if( ifButton.isPressed() ){
ifButton.setRelease( false );

ifLed.toggleBlink();

Serial.println("iFButton pressed !!! " );

}
}

이상으로 ESP32에서 FreeRTOS의 유래와 기초적인 사용법에 대해서 공부를 해 보았습니다.

실제 사용중인 코드에는 다양한 FreeRTOS함수들이 사용되고 있지만 차후 릴리즈될 중급 편 강좌에서 세마포어와 같이 복잡한 함수들의 사용법을 좀더 상세히 다루도록 하겠습니다.

iFBalance FreeRTOS 버튼 및 LED 동작 영상
Shoot by Serimo on 2021-3-09
iFBalance FreeRTOS 버튼 및 LED 동작 영상